AURENA Tech welcomes new Senior DevOps Engineer
We are happy to welcome Andrei Kishkin to the AURENA Tech team. With more than 20 years of experience, he will be a strong addition to our DevOps division.
08.09.2022
written by Tatjana Statescu
To improve the experience of our back office employees and partners during the auction distribution days, our tech team was given the challenge to develop a new mobile application, which we called “AURENA Seller“. Our back office team mostly uses Apple devices, so we chose to support iOS only for the MVP.
Our test strategy includes various types of testing, but in this article, I would like to say more about how we approached writing end-to-end tests.
End-to-end tests are the highest level tests in the test pyramid. They are the slowest and have a high maintenance cost, but they exercise all the technical modules of the application and can answer the question: “Can a real user do a real business operation?“. That’s why we decided to automate only the crucial business scenarios as test cases. In this article, I will focus on one of these crucial business scenarios: logging into the application.
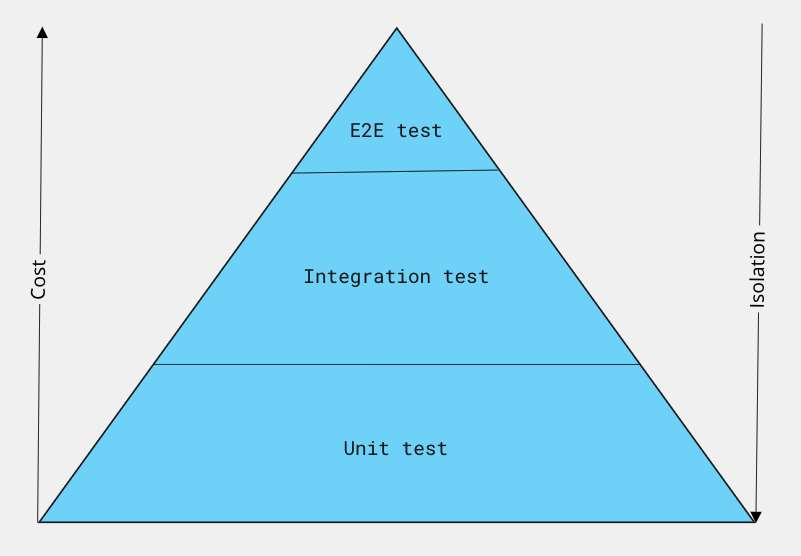
A simplified version of the Test Pyramid
We think that choosing the right tool for any kind of task already solves 50% of the task. That’s why we chose to use Robot Framework as an automation framework. It is a widely used tool, it has a very large community and a lot of useful libraries. And the main reason, we are already using this tool for our end-to-end tests for the auction platform, so this was an easy choice.
The next choice was where to run the tests. We wanted to run our cases on simulators or real devices. The first idea that can come to one’s mind would be to buy all the devices we want to support and set up a device lab. This is very expensive and requires a lot of maintenance. Luckily there are cloud platforms providing devices on-demand.
After some market research, we ended up with two platforms to choose from: Perfecto Mobile and Browserstack.
The important features that we were looking at were the integration with Robot Framework, the availability of a wide range of iOS devices, and the possibility to upload artifacts easily. As we were also planning to use a cloud device platform for manual testing, we also valued the potential to gather metrics for network traffic and CPU load and to simulate geolocations.
In the end, we chose Perfecto for the price, range of iOS devices, and mobile features provided.
Now the first challenge was to get our build artifact (the .ipa file in our case) into Perfecto. Luckily Perfecto provides a way to do this via its API.
Our artifact is built in a tool called Bitrise CI. Bitrise CI provides a blueprint pipeline step that uses the functionality provided by Perfecto to upload artifacts. So we just went ahead and used that template. We just needed to input the correct variables.
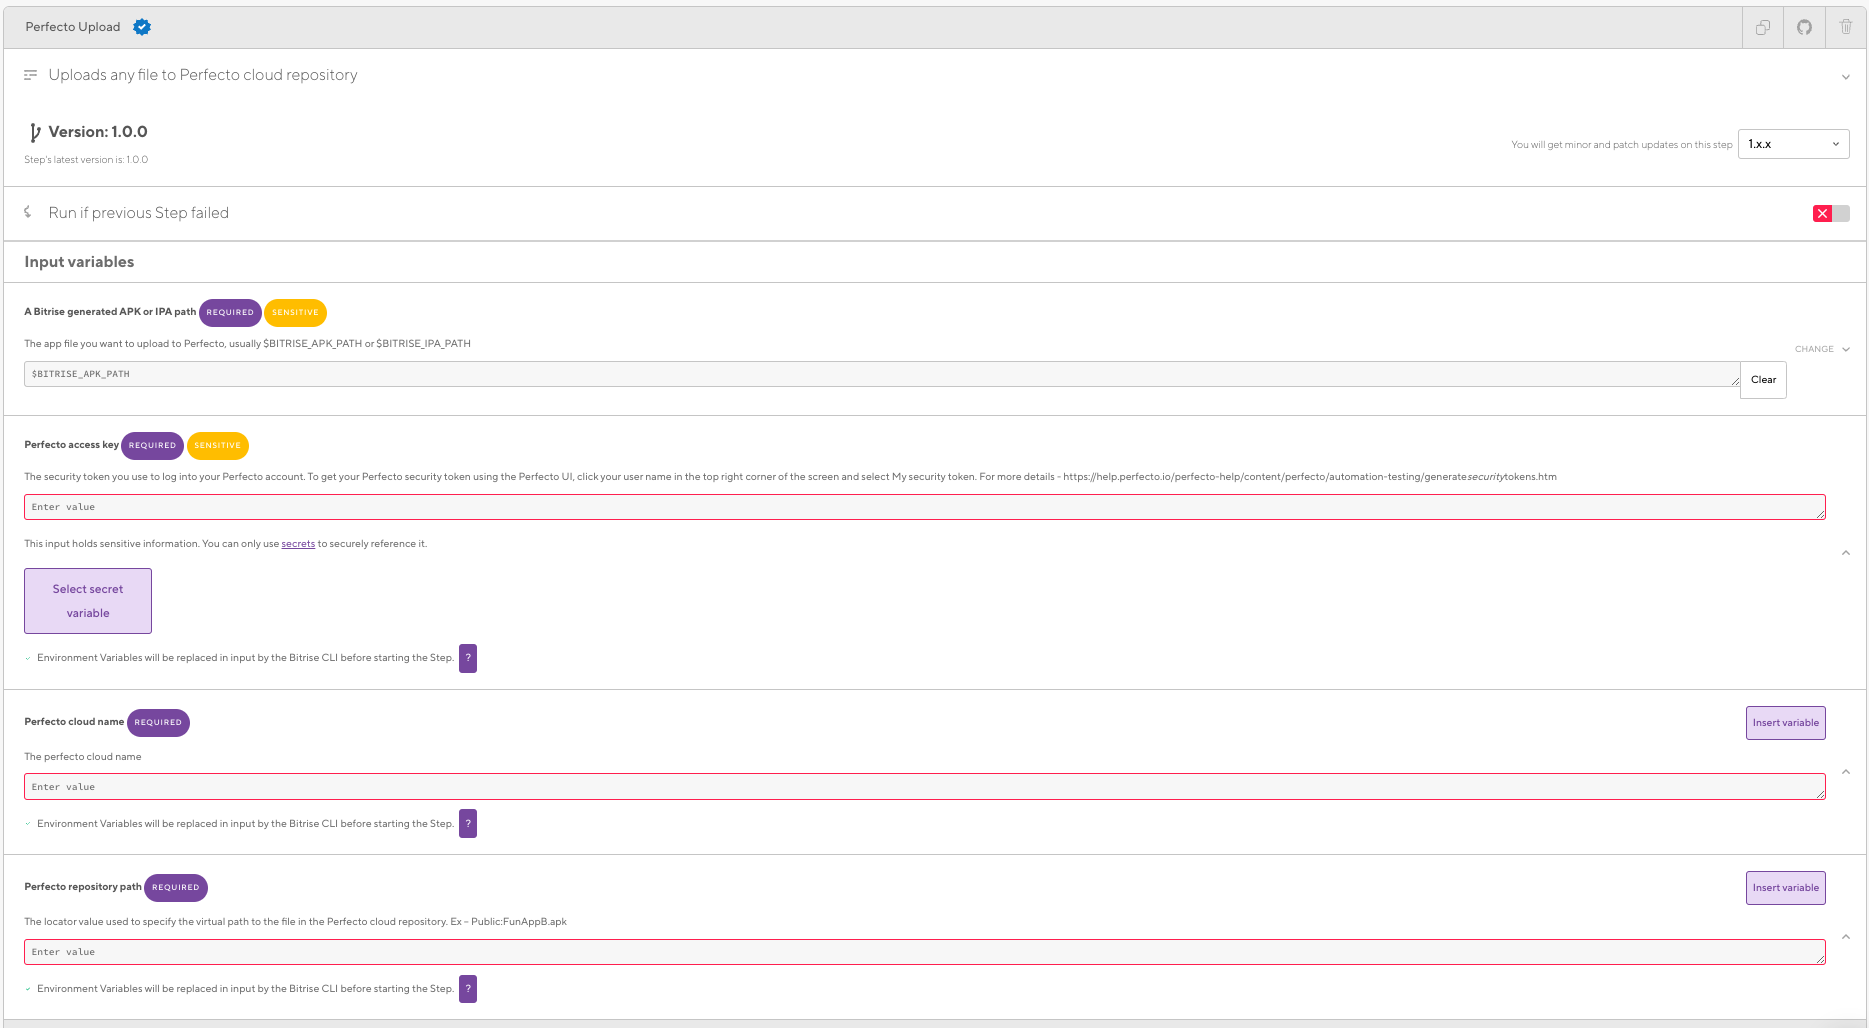
The configuration of the “Perfecto Upload” step in Bitrise CI
To use Robot Framework, some environment setup was needed.
Robot Framework is a python-based tool, so Python setup was needed beforehand. Robot Frameworks documentation extensively describes what needs to be done. We also chose to use python’s virtual environment to keep track of all the dependencies and install them with ease anywhere we need them.
Here is how we set it up:
                pip3 install virtualenv

#Create venv
virtualenv -p python3 venv

#Activate venv
source venv/bin/activate
Then we needed to install Robot Framework itself. It was easy to follow the installation instructions of Robot Framework. We also installed the Perfecto library.
pip3 install robotframework perfectolibrary_py37
To keep track of the dependencies we stored them in the requirements.txt file:
pip3 freeze > requirements.txt
We did it to ease the setup in any new environment which we would use to write or run the tests.
Here is how it would work: first the virtual environment would need to be created and then the dependencies would need to be installed:
source venv/bin/activate && pip3 install -r requirements.txt
The environment was finally ready, and we started writing the first test case.
Robot Framework provides human-like language keywords to compose our scenario. You can find detailed documentation in the Robot Framework user guide, and the description of keywords from the Appium Library (which is used by Perfecto Robot Framework library) is available here.
The first thing was to import the libraries that we wanted to use:
                *** Settings ***
Library           AppiumLibrary
Library           PerfectoLibrary
Then we needed to connect to a device in Perfecto, install the application under test, and open it. Here we used the keyword from Perfecto Robot Framework library Open Application
Looking at this keyword documentation, we could see that it can accept a lot of different parameters. Some we wanted to change in our test script, and some could remain constants.
So we decided to define the constants we wanted to use:
                *** Variables ***
${perfectoUrl}  https://our.url.from.perfecto.account
# since we don't want to hard code this variable for security reasons
# we get its value from the respective environment variable
${perfectoSecurityToken}=         %{PERFECTO_TOKEN}
# these variables also depend on the environment and can be passed from outside
# as environment variables
${applicationName}=               %{APP_NAME}
${environment}=                   %{ENVIRONMENT}
${iOSPlatformName}                iOS
${appleManufacturer}              Apple
${iPhoneModelPrefix}              iPhone.*
${eventTimingsParam}              true
${iOSResignParam}                 true
As we preferred to choose the application name, device model, and the iOS version later, we wrapped Open Application into a keyword Open test device in Perfecto and launch seller-app.
With this keyword, we would pass ${deviceModel} and ${platformVersion} as parameters from our test script. This would allow more flexibility and the possibility to change those values or rewrite our script in a data-driven way to test multiple devices at the same time in the future.
                *** Keywords ***
Open test device in Perfecto and launch seller-app
    [Documentation]  Opens the device and the application in it
    [Arguments]  ${deviceModel}  ${platformVersion}
    Open Application    ${perfectoUrl}  securityToken=${perfectoSecurityToken}
        ...              model=${deviceModel}
        ...              platformVersion=${platformVersion}
        ...              app=${applicationName}
        ...              platformName=${iOSPlatformName}
        ...              manufacturer=${appleManufacturer}
        ...              eventTimings=${eventTimingsParam}
        ...              iOSResign=${iOSResignParam}
It’s worth mentioning that we also provided extra options here: iOSResign=true means that Perfecto will replace the app’s signature and resign it with a Perfecto code signing certificate that has the cloud device provisioned; eventTimings=true permits the retrieval of the timing information about the startup and command length, that we could use down-stream for performance measurements.
It is a specific functionality of our application, that any test build presents a dialog, after opening the app, for the tester to choose a backend environment, with a simple tap on the environment name. Therefore we needed to implement an extra keyword Choose the environment
                Choose the environment
    [Documentation]   Choose environment seller app is sending requests to
    Click Text  ${environment}
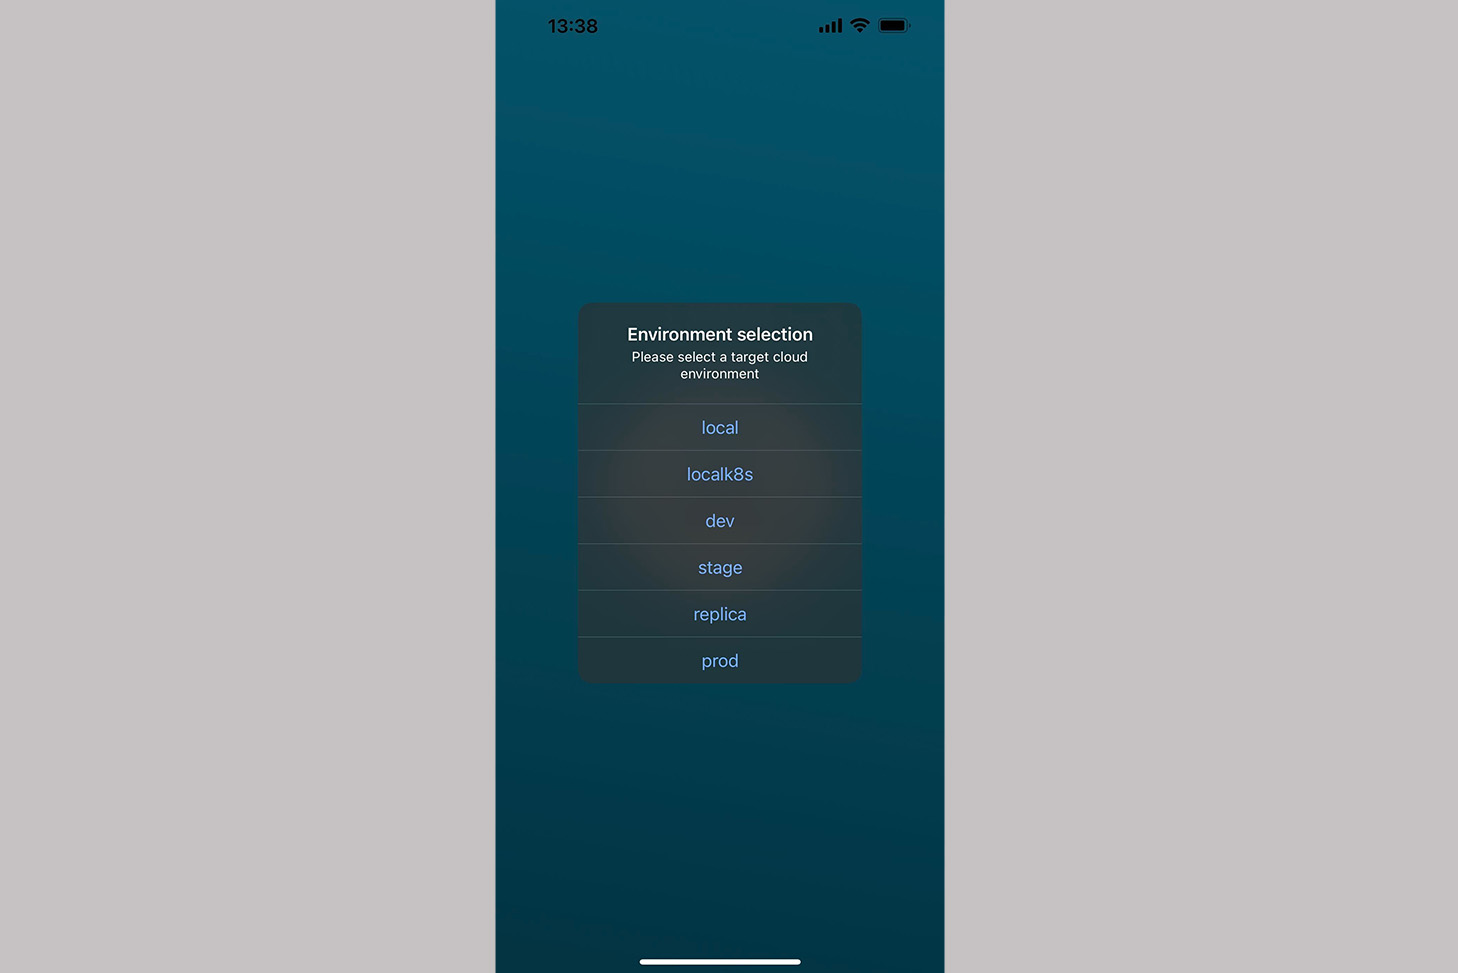
Environment selection in “AURENA Seller“ mobile application
We could use the keywords we created earlier to define the steps that would run in the suite startup:
                Suite Setup  Run Keywords
...    Open test device in Perfecto and launch seller-app  iPhone-13 Pro  15.0
...    AND    Choose the environment
We also had to take care of what happens when the test suite finishes when all applications needed to be closed on the device under test.
Suite Teardown Close All Applications
Finally, we were ready to write the first actual test case. As mentioned above, we wanted to test one of the basic functionalities: logging into the application.
For the scenario, we decided to define some more keywords.
First the login itself. To keep the script clean, all the locators were defined in the constants section, as shown below:
                Login into the application
    [Documentation]   Login into seller-app with provided email and password
    [Arguments]  ${userEmail}  ${userPassword}
    Wait Until Element Is Visible  ${emailLocator}
    Tap  ${emailLocator}
    Input Text  ${emailLocator}   ${userEmail}
    Input Text  ${passwordLocator}  ${userPassword}
    Click Button  ${loginButtonLocator}
We also added an extra keyword to check if the user is logged in by waiting for known elements to appear.
                User is logged in
    [Documentation]  Checks if user is logged in
    Wait Until Element Is Visible  ${distributeLotButtonLocator}
    Element Should Be Visible  ${distributeLotButtonLocator}
    Element Should Be Visible  ${loggedinAurenaLogoLocator}
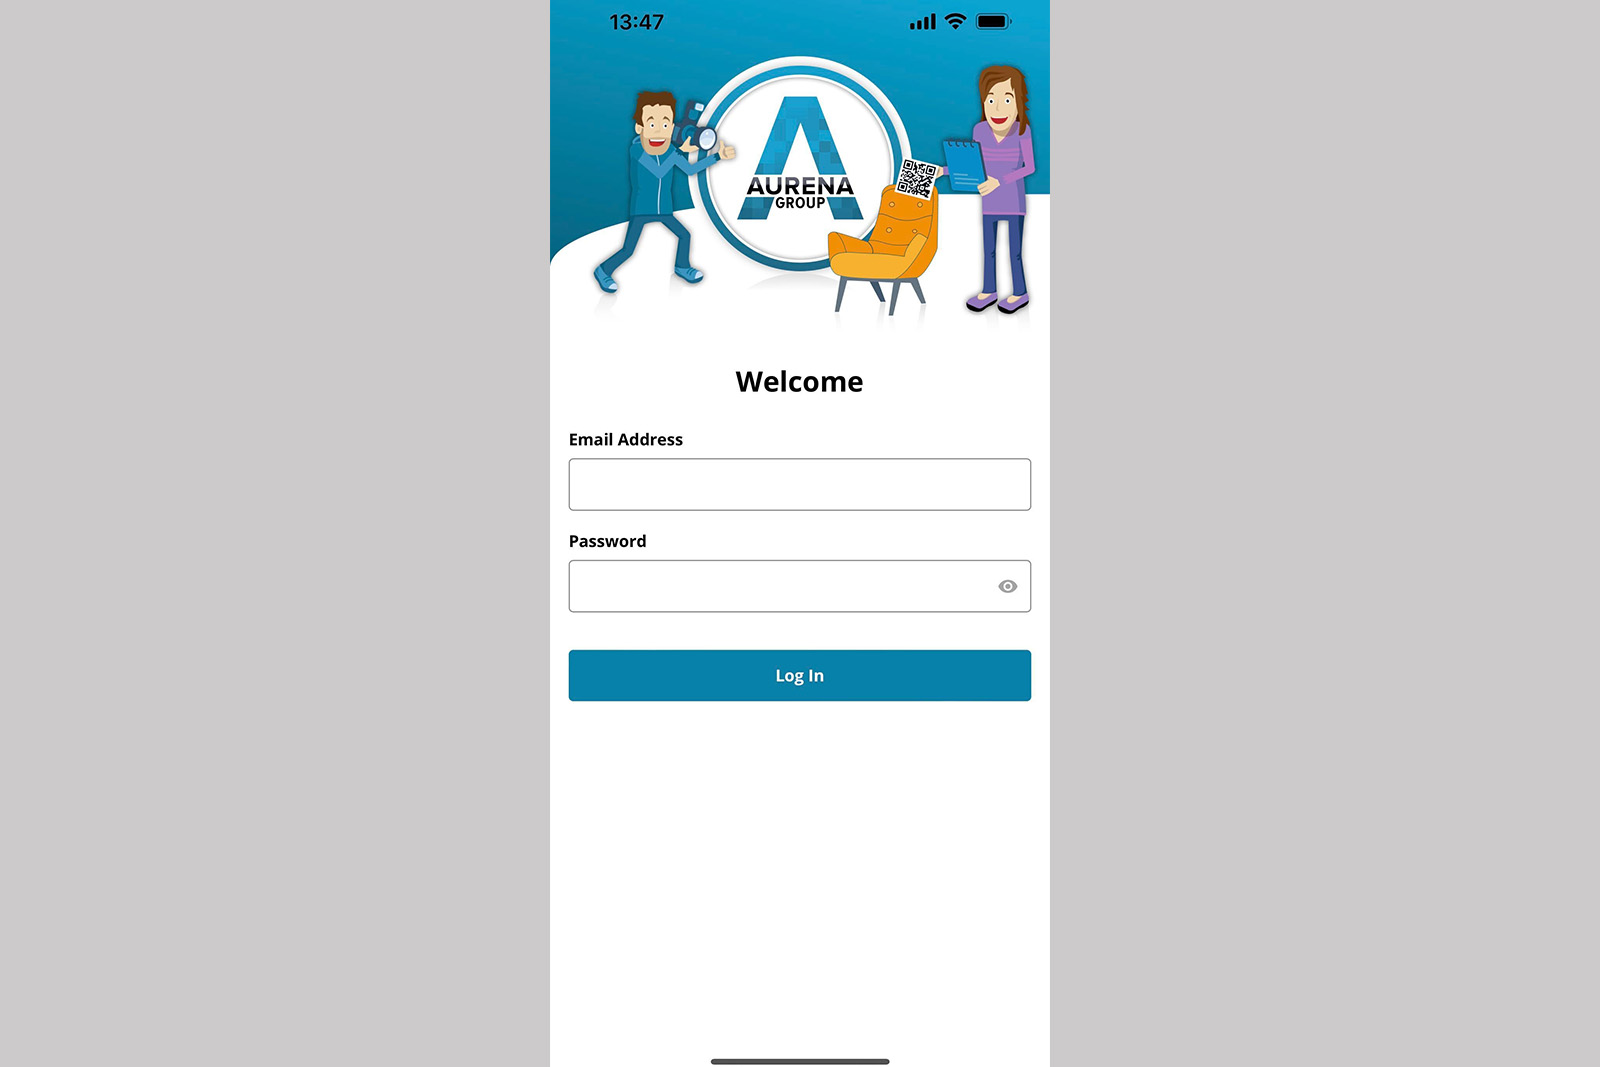
“AURENA Seller“ application login screen
After defining all the needed building blocks we could put together our test case.
                *** Test Cases ***
User can login
    [Documentation]    User can login into seller-app
    Login into the application  ${email}  ${password}
    User is logged in
To sum up, here is how the whole script looks together login.robot
                *** Settings ***
Documentation  This test suite tests login functionality
Library           AppiumLibrary
Library           PerfectoLibrary

Suite Setup  Run Keywords
...    Open test device in Perfecto and launch seller-app  iPhone-13 Pro  15.0
...    AND    Choose the environment

Suite Teardown  Close All Applications

*** Variables ***
#from the environment
${applicationName}=               %{APP_NAME}
${environment}=                   %{ENVIRONMENT}
${perfectoSecurityToken}=         %{PERFECTO_TOKEN}
#connection related constants
${perfectoUrl}                    https://our.url.from.perfecto.account
${iOSPlatformName}                iOS
${appleManufacturer}              Apple
${iPhoneModelPrefix}              iPhone.*
#locators
${emailLocator}               Email Address
${passwordLocator}            Password
${loginButtonLocator}         Log In
${wrongPasswordError}         Email or password incorrect
${email}                      *************
${password}                   *************
${welcomeLocator}             Welcome

*** Keywords ***
Open test device in Perfecto and launch seller-app
    [Documentation]  Opens the device and the application in it
    [Arguments]  ${deviceModel}  ${platformVersion}
    Open Application    ${perfectoUrl}  securityToken=${perfectoSecurityToken}
        ...              model=${deviceModel}
        ...              platformVersion=${platformVersion}
        ...              app=${applicationName}
        ...              platformName=${iOSPlatformName}
        ...              manufacturer=${appleManufacturer}
        ...              eventTimings=true  iOSResign=true

Choose the environment
    [Documentation]   Choose environment seller app is sending requests to
    Click Text  ${environment}

Login into the application
    [Documentation]   Login into seller-app with provided email and password
    [Arguments]  ${userEmail}  ${userPassword}
    Wait Until Element Is Visible  ${emailLocator}
    Tap  ${emailLocator}
    Input Text  ${emailLocator}   ${userEmail}
    Input Text  ${passwordLocator}  ${userPassword}
    Click Button  ${loginButtonLocator}

User is logged in
    [Documentation]  Checks if user is logged in
    Wait Until Element Is Visible  ${distributeLotButtonLocator}
    Element Should Be Visible  ${distributeLotButtonLocator}
    Element Should Be Visible  ${loggedinAurenaLogoLocator}

*** Test Cases ***
User can login
    [Documentation]    User can login into seller-app
    [Tags]    login  perfecto
    Login into the application  ${email}  ${password}
And now the drumroll moment… we could finally run our test:
                export ENVIRONMENT=development
export PERFECTO_TOKEN=our-token
export APP_NAME=GROUP:SellerApp.ipa
export ROBOT_OPTIONS="--outputdir reports" && robot tests/login.robot
In the reports folder, Robot Framework created a nice HTML report with the test results:
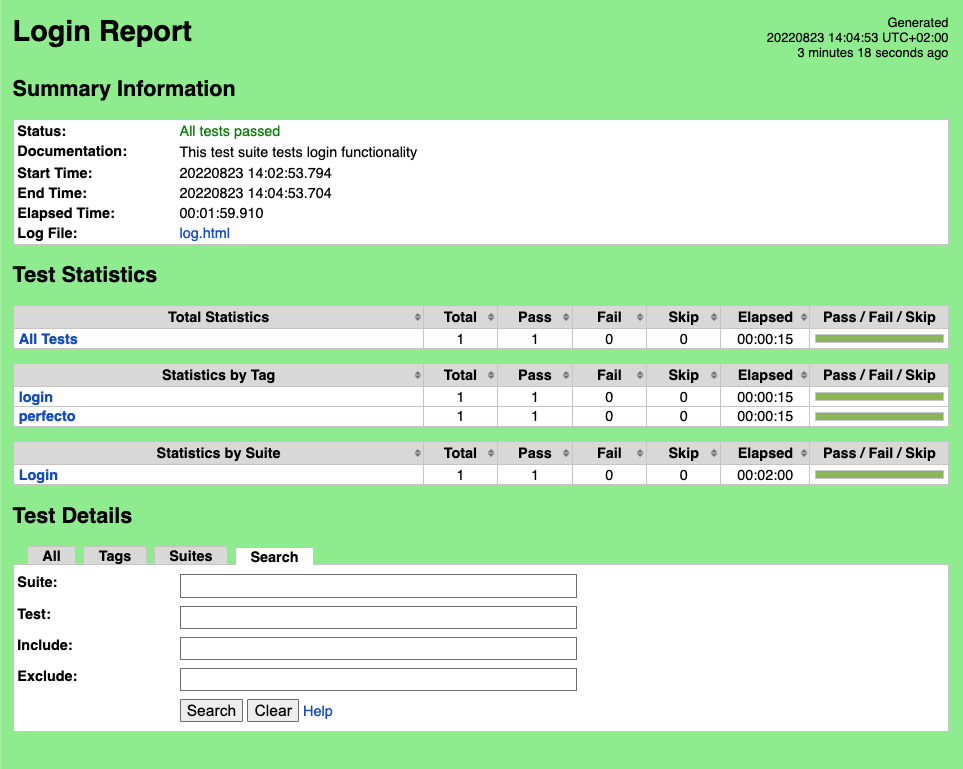
report.html file after test execution
It is always great to have the possibility to automatically check if the code we wrote is following standards. Robot Framework offers a linting library for that purpose, so we decided to try it out too, and add it to our pipeline. For that, we needed to install the robotframework-lint package:
pip3 install --upgrade robotframework-lint
Then we just had to run the linting script:
rflint tests/*
Also, there are plugins for VSCode and IntelliJ to help you write a better RobotFramework code.
We are still learning a lot about iOS development and testing. We found that using RobotFramework for end-to-end testing was definitely a successful experience. It is easy to write test cases and execute them on different devices when using the automation framework together with the cloud platform. We are constantly expanding our test suites along with the continuous delivery of new features.
Interested in working with us? Take a look at our open positions at AURENA Tech.